Colorful Creations: How to Dye Pasta and Make Fun Necklaces!

🌱 Learning Connections
Sequencing & Following Directions: The dyeing process is perfect for practicing sequencing skills (First, Second, Third). Have children recite the steps—it’s a multi-step project that requires following a process!
Fine Motor Skills: The act of picking up and carefully threading the pasta onto the string is an excellent activity for building fine motor dexterity and hand-eye coordination.
Math: Practice patterning by discussing the colors and shapes. (e.g., “We need two red, then one blue. What comes next?”)
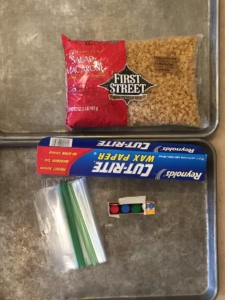
What You’ll Need:
Dry Pasta: Any shape with a hole will work! Penne, ditalini, wagon wheels, and macaroni are all great choices for stringing.
Food Coloring: Liquid food coloring works best for vibrant hues. Gel colors can also be used but may require a bit more mixing.
Rubbing Alcohol or White Vinegar: This helps the color adhere to the pasta.
Resealable Plastic Bags: One for each color you plan to make.
Baking Sheets: To spread out the pasta for drying.
Wax Paper or Parchment Paper: To line the baking sheets and prevent sticking.
String, Yarn, or Pipe Cleaners: For making the necklaces. Shoelaces also work wonderfully for little hands!
Optional: Skewers or Craft Needles (can help with stringing, especially for smaller pasta shapes).
Part 1: How to Dye Your Pasta
The dyeing process is simple, fast, and the most exciting part for little ones!
Step 1: Prep Your Color Mix
Pour about 1/4 cup of dry pasta into a resealable plastic bag. Add a generous amount of food coloring (start with 15–20 drops for a vibrant color) and 1–2 teaspoons of rubbing alcohol or white vinegar.


Step 2: Shake, Shake, Shake!
Seal the bag tightly, making sure all the air is pressed out. Hand the bag to your child and let them shake and squish the pasta until the color is evenly distributed. Ensure every piece is coated! (You may need to add a few more drops of color if the pasta looks pale.)


Step 3: Let It Dry
Line your baking sheets with wax paper. Dump the colored pasta onto the sheet and spread it out into a single layer. This is crucial for quick and even drying. Repeat this process for every color you want to make.
Pro Tip: Let the pasta dry completely—ideally for several hours or overnight. If the pasta is still damp, the color will rub off on your child’s hands.


Part 2: Stringing the Necklaces
Once your pasta is completely dry, the fun of turning it into jewelry begins!
1. Prepare the String
Cut your string or yarn to the desired necklace length (about 25–30 inches is a good start). To make stringing easier for toddlers and preschoolers, wrap a small piece of tape tightly around one end of the string to create a firm “needle tip.” If using pipe cleaners, simply bend one end into a loop to prevent the beads from sliding off.

2. Start Stringing!
Encourage your child to thread the pasta pieces one by one. This requires focus and precision, making it a great concentration exercise.


3. Encourage Patterning
As they string, ask them to create patterns: “Can you do red, then green, then red again?” This introduces early math concepts and logical thinking in a playful way.

4. Finish and Wear
When the necklace is full, tie the two ends of the string together. Now your child has a beautiful, colorful, custom-made piece of art they can wear!


Helping Children Thrive
Miss Anna’s Class Video Course prepares your child for kindergarten success. We use exciting science and phonics to launch reading and build confidence, ensuring your child starts ahead of their peers and is guaranteed to be ready for school.

👉 Save this idea on Pinterest so you’ll have these meaningful holiday crafts ready for your next history lesson!
